Add and format text and captions
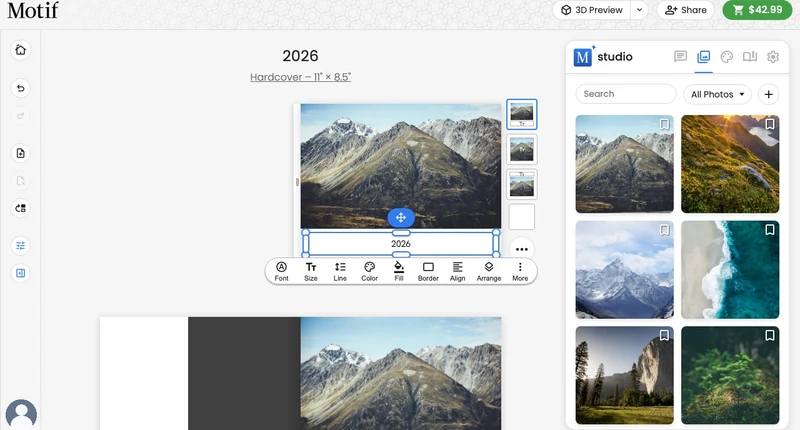
Text can tell the story behind a photo, introduce a chapter, personalise a card, or add a note to a calendar date. Select a text area to edit it and open its formatting tools.
Add a text box
- Select or point to an open part of an eligible page.
- Open Page options and choose Add Text to Page….
- Select the new text box and replace the suggested wording with your own.
Format text
Use the text toolbar to change:
- font family, weight, and italic style;
- size and colour;
- the fill colour and opacity behind the text box;
- the border around the text box;
- left, centre, or right alignment and top, centre, or bottom position within the box (both in Align);
- line spacing; and
- the space between letters (Spacing).
With no words highlighted, a formatting change applies to the whole text box. Highlight a word, phrase, or paragraph first to format only that selection. Paragraph alignment and line spacing apply to the selected paragraph; vertical position, fill, border, and letter spacing always apply to the whole box.
Use the More menu to copy the current style to all page text, captions, date notes, or holiday text when that option is available. Copying a style to all page text copies its fill and border too, so text boxes without a fill lose theirs. When a copied style would make any text no longer fit, Motif Studio sets that text in a smaller size, or keeps its earlier style if even the smallest size cannot hold it. Words are never cut.
To remove a text area, open More and choose Delete Text Box or Delete Caption. If you add another text area afterward, select it to begin a new edit. Erasing all of a box's words keeps it on the page as an empty box; the check before ordering lists it so you can fill it in or delete it. The front-cover title can't be deleted, but you can change its words.
Fill and border a text box
Fill paints a solid colour behind the whole text box, which is handy for a title band across a photo or a panel that separates a note from the page. Choose the colour from the same picker used for text and page colours; your project swatches are there too. No Fill removes it.
The Opacity value in the Fill tool applies to both the fill and the border. Lower it in 5% steps to let the page or photo show through; the words themselves always print at full strength.
Border works exactly like the border tool for photos and maps: choose a size, a corner radius, and a colour. The corner radius rounds the fill as well.
Motif Studio checks text against its fill, not the page, and automatically keeps it readable: ink that would be hard to read on the band is corrected to a readable colour whenever you edit the box. One case is left to your eye: when a fill is partly transparent over a photo, the picture shows through and the right ink depends on what is behind it, so Motif Studio keeps your colour and shows no automatic warning there. A full-opacity fill hides the photo, so it is checked like any other band. Fills and borders are not available on captions, the photo-book spine, or calendar date notes. Switching themes replaces fills and borders along with the other text styles; use Undo to bring them back.
Space letters
Spacing sets the space between the letters of the whole text box: Tighter, Tight, Normal, Wide, Wider, or Widest. Wide spacing suits short titles and labels; on longer text it takes more room, so watch for the red warning that text no longer fits.
Spacing is available on page text, cover titles, captions, card text, and calendar date notes and holiday text. It is not available on the photo-book spine. On a phone, find it under Style in Edit Text. You can also ask Chat to change the spacing. Switching themes resets spacing to the new theme's style; use Undo to bring yours back.
Edit photo-book spine text
Hardcover and layflat photo books start the spine with the current book title. If you change a softcover or notebook into a hardcover or layflat book, Motif Studio copies the current front-cover title onto the newly available spine. The spine is separate from the front-cover title after that, so you can select the spine itself and change its words, font, weight, italic style, colour, or position without changing the front cover. Use Align to place it at the top, centre, or bottom of the spine; Motif Studio keeps it inside the printable safe area at either end.
Pasted text keeps the spine's fixed size and line spacing. Unsupported formatting is removed; font, bold and italic formatting are kept.
The spine prints over the solid cover colour even when the front cover uses a photo. Motif Studio checks and adjusts spine contrast against that solid colour independently from the title over the front-cover photo.
Add a caption
- Select or point to the page.
- Open Page options and choose Add Caption to Page….
- Select the caption to revise its wording or style.
A caption belongs to the page rather than to one photo. It sits below the main page layout instead of occupying a normal layout position. An eligible page can have one caption, and it cannot also contain a normal text box. Captions are unavailable on front covers and jacket flaps. Supported panoramic photo-book spreads and selected memo-book surfaces can use them.
On a two-page hardcover or softcover spread, centred captions are unavailable so the text does not cross the binding.
Edit text on a phone
In portrait orientation, tap live page text to open the full-screen Edit Text view. The text appears larger for comfortable editing without changing its printed size.
- Type or format your text.
- Choose Done to update the page, or Cancel to discard the open draft.
- Wait if a Saving changes… message appears before leaving the project.
A long press on text before the full-screen editor opens starts a move gesture instead. Once Edit Text is open, touch gestures select and edit text normally.
Respond to a text warning
A red warning symbol can mean that text does not fit or does not have enough contrast against its background.
- For text that does not fit, shorten it, choose a smaller size, increase the available layout space, or adjust line spacing.
- For low contrast, choose a lighter or darker text colour, or change the page background.
Chat keeps the text it writes, resizes or rearranges inside its box. If a change would make text overflow, Chat sets it in a smaller size. If even the smallest size cannot hold it, Chat shortens wording it wrote itself and tells you when words you gave it do not fit; anything still too long when Chat finishes is shortened with an ellipsis (…). The reply says what changed. Text that already had a warning before your request is left for you to adjust. This includes text in boxes you moved or resized, on a designed cover, on a back cover, on a jacket flap and in a calendar's date boxes, where a holiday's name is set smaller but never shortened, and keeps its earlier style if a new one would not fit. In a two-page spread's text box, until you move or resize it, Chat does not adjust text for you, so check it for the red warning.
Chat also keeps the colours it sets readable. If you ask for a text colour that would be hard to read on the text's background, Chat keeps the text's earlier colour, or gives new text a readable one, and says so in its reply. To use that colour anyway, ask Chat to put a fill behind the text box or to change the background. This includes a calendar's date notes and holiday text.
For text over a solid colour or pattern, the warning clears when the same check finds that the text is readable. A single photo colour cannot reliably represent the local detail behind every word, so Motif Studio preserves your chosen text colour and does not show an automatic contrast warning for text over a photo or journey map. In a custom layout with separate text boxes, this applies only to a text box that actually overlaps the visual; text over the page background is still checked normally. Visually review image-backed text before ordering. Learn more in Review before ordering.